This post may contain affiliate links. Please read my disclosure policy.
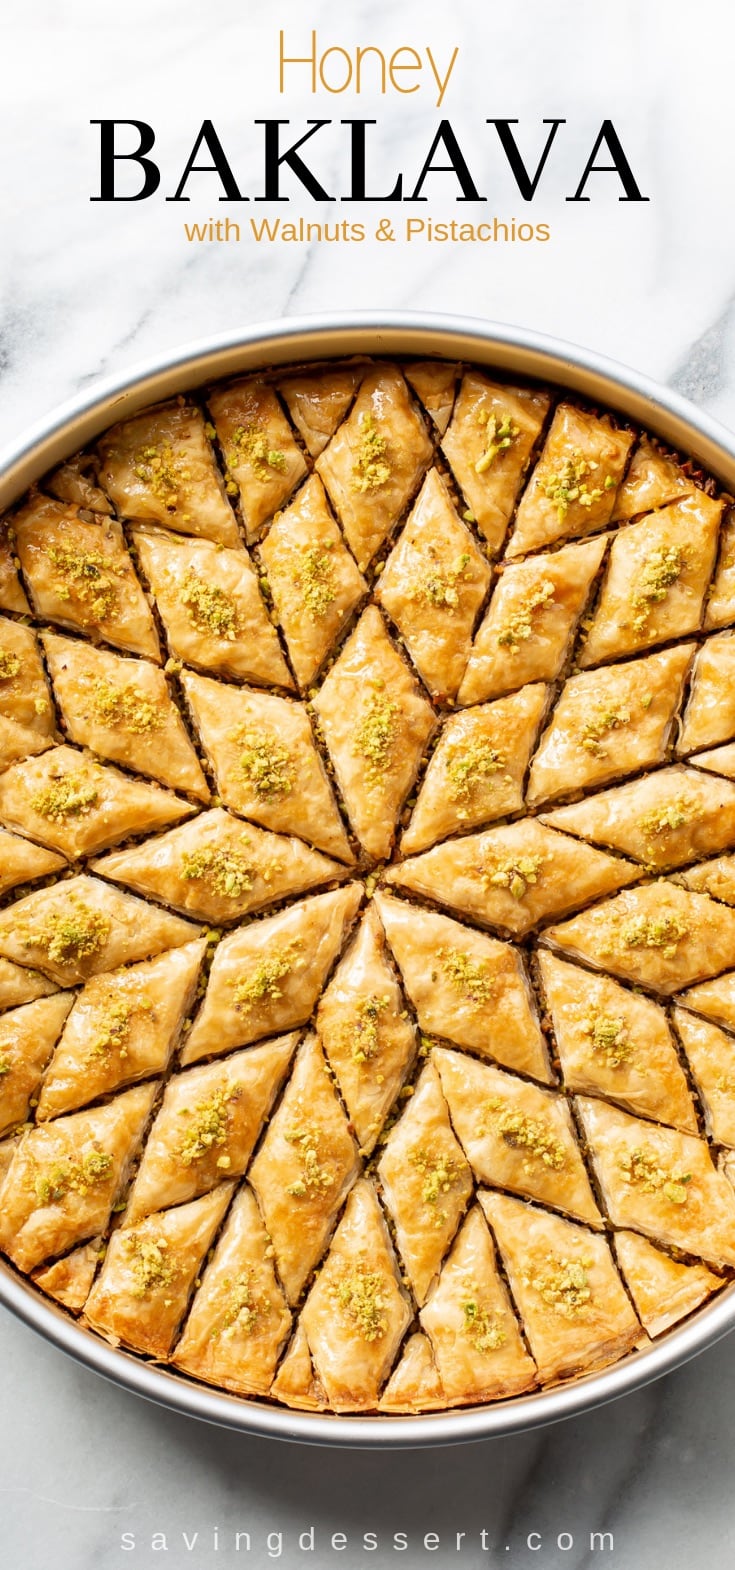
Honey Baklava Recipe with Walnut and Pistachios

Layers and layers of phyllo slathered with melted butter, honey and loads of nuts.
Who could resist a slice of this delicious golden brown Honey Baklava Recipe?!
Hey to all our baker-buddies out there! I was wondering if you have a must-make recipe bucket list? I don’t have a formal list per se, but there are tons of recipes I want to make and bake, create and eat! Good thing I’m in the recipe business!
This dessert has been on my mind for years and since it’s too cold to do anything outside these days, I thought a nice baking project was just the thing for a cozy weekend in the kitchen. While there are a few steps to make an authentic gooey baklava, it’s worth every minute it takes to assemble and bake.

Honey Baklava is not a new creation in the world of amazing desserts
To create this recipe I pulled ideas from numerous authentic recipes found around the world. After lots of research I used the assembling and baking methods published by Cook’s Illustrated.
Ultimately I was trying to recreate a fantastic Honey Baklava recipe we enjoyed in a market in Vienna, Austria last spring. While this baklava recipe isn’t dripping in honey like that we had in the Naschmarkt, it certainly has plenty of texture and gooey, sticky yumminess throughout all the delicious flaky layers.

Kitchen tools you’ll need to make this Honey Baklava Recipe:
- a soft pastry brush to slather on the melted butter;
- one large sheet of plastic wrap to cover the phyllo while assembling;
- a clean damp tea towel to cover the phyllo to prevent drying out;
- a food processor to grind the nuts;
- a sharp knife to cut the phyllo into a round shape to fit the pan, and to cut Baklava into diamonds. A super sharp paring knife will work well too.
- a large cutting board to cut the phyllo pastry.
Ingredients Overview
Honey syrup:
- granulated sugar
- water
- honey
- fresh lemon juice
- salt
Nut filling:
- unsalted pistachios
- walnut halves
- ground cinnamon
- granulated sugar
- salt
For the flaky layers:
- unsalted butter
- frozen store-bought phyllo dough, thawed

Overview: How to make Baklava Recipe
1. Prepare the honey syrup
Combine the syrup ingredients in a deep saucepan. Bring to a full boil then reduce the heat and simmer for 5 minutes. Cool slightly then pour the mixture into a measuring cup with a spout. Cool completely.
TIP: Honey syrup can be made ahead and refrigerated for up to 4 days.
2. Prepare the nut filling
Pulse the pistachios in a food processor until finely chopped. Transfer the ground pistachios to a medium bowl. Pulse the walnuts and add to the bowl. Add cinnamon, sugar and salt and mix to combine. Set aside.
3. Assemble the Baklava
Preheat oven to 300 degrees F. Brush a 12-inch round baking pan with melted butter. Set aside.
PRO TIP: This Baklava recipe can also be made in a smaller 13×9-inch baking pan. See recipe for adjustments.
Unfold the phyllo onto a large cutting board. Cut to fit into the pan you are planning to use. Cover the phyllo with plastic wrap then a damp kitchen towel to prevent drying out. Set aside.
- Place one phyllo sheet in the bottom of the pan or baking dish and brush with butter. Repeat with 7 more phyllo sheets.
- Spread one-third of the nut mixture over the phyllo.
- Cover the nuts with another sheet of phyllo drizzled with butter. Repeat with 5 more sheets of phyllo brushing with butter between the layers.
- Layer half the remaining nut mixture over the buttered phyllo.
- Repeat with six sheets of phyllo brushing all but the final sheet with butter.
- Using your hands compress the layers starting in the center and working outward to remove air pockets.
- Spoon 4 tablespoons of melted butter on the top layer to cover the entire surface.
4. Cut the Baklava before baking
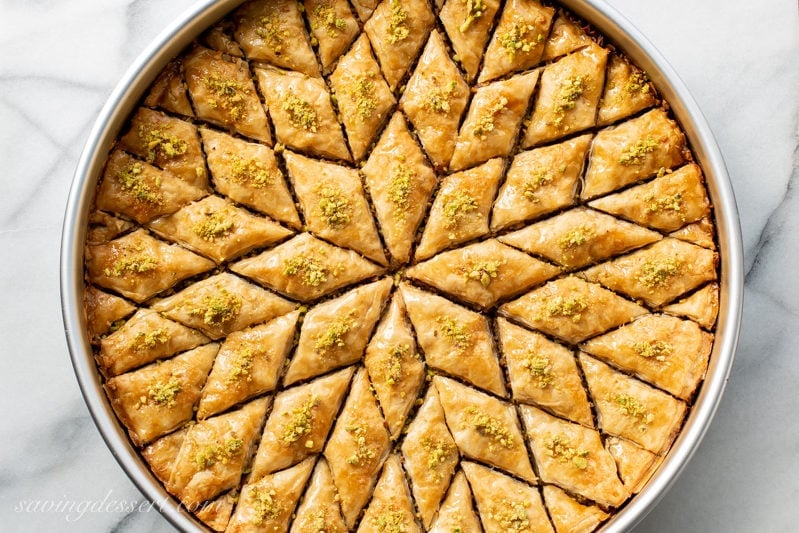
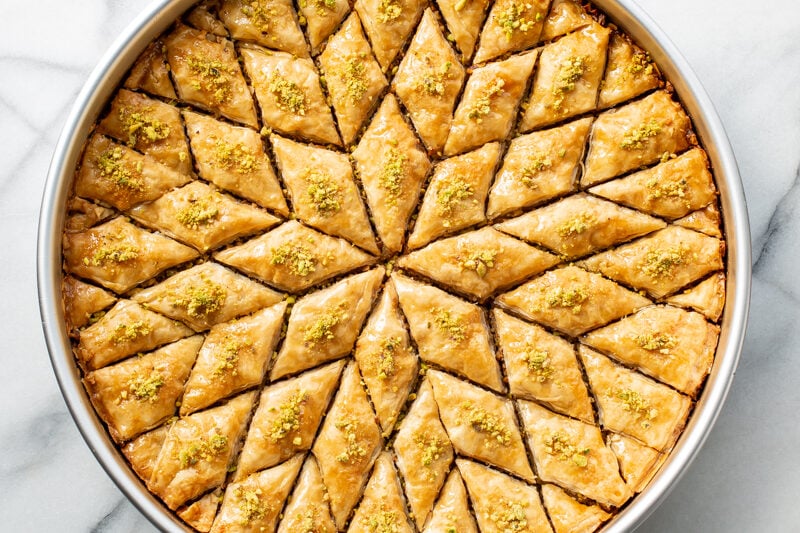
Using a sharp knife with a pointed tip, cut the baklava into your desired pattern. We’ve provided detailed steps to create the diamond pattern seen below in the printable recipe.
5. Bake and cover with honey syrup
Bake until golden brown and crisp, about 1-1/2 hours. Remove from the oven and immediately pour the cooled honey syrup over the cut lines until about 1/2 cup remains. Drizzle the remaining 1/2 cup syrup over the surface. Sprinkle each piece with a pinch of ground nuts.
Cool to room temperature on a wire rack, about 4 hours. Cover with foil and leave at room temperature for 8 hours over overnight before serving.

There are plenty of moving parts to this Honey Baklava Recipe, but it’s not hard to make.
Reading through our detailed, easy recipe a few times will ensure a successful bake. Having all ingredients pre-measured and at the ready is key to easy assembly.
And don’t worry, you don’t have to use a 12-inch round baking pan to make this Honey Baklava Recipe. I’ve included directions for a smaller baklava recipe baked in a 13×9-inch baking pan.
If you want to make a large round baklava too, I bought my 12-inch baking pan at Michael’s and had a 50% off coupon. The pan cost $6.74 and can be used for large cakes too.
How to store Baklava
As show here, this recipe makes 48-50 small pieces of baklava. Good thing baklava keeps well for up to 10 days to 2 weeks at room temperature tightly wrapped in foil or an airtight container.
Enjoy!
Thanks for PINNING!
Honey Baklava Recipe
Ingredients
For the honey syrup:
- 1 cup granulated sugar
- 1 cup water
- 1 ¼ cups honey
- 2 tablespoon fresh lemon juice
- ¼ teaspoon salt
For the nut filling:
- 12 ounces shelled unsalted pistachios, plus more for garnish
- 12 ounces walnut halves
- 2 teaspoons ground cinnamon
- 3 tablespoons granulated sugar
- ⅛ teaspoon salt
For the layers:
- 1 ½ cups unsalted butter (3 sticks) melted and cooled slightly
- 1 ½ pounds frozen phyllo, thawed
Instructions
Tools you will need to make the Baklava:
- a soft pastry brush to brush on the melted butter;
- one large sheet of plastic wrap to cover the phyllo;
- a clean damp tea towel to cover the phyllo to prevent it from drying out;
- a food processor to grind the nuts;
- a sharp chef’s knife to cut the phyllo into a round and to cut Baklava into diamonds. A super sharp paring knife will work well too.
- a large cutting board to cut the phyllo.
To prepare the honey syrup:
- Combine the honey syrup ingredients in a deep medium saucepan. Bring to a full boil over medium-high heat, stirring occasionally until the sugar is dissolved. (Don’t walk away as it may boil over!) Reduce heat to medium low and simmer without stirring, for 5 minutes, but watch it carefully. Remove from the heat and cool slightly. Pour into a measuring cup with a spout and cool completely. The honey syrup can be made ahead and refrigerated for up to 4 days.
To prepare the nut filling:
- Pulse the pistachios in the food processor until finely chopped, about fifteen 1-second pulses. Pour the pistachios into a medium bowl. Pulse the walnuts in the food processor until very finely chopped, about fifteen 1-second pulses. Add the walnuts to the bowl with the pistachios. Add the cinnamon, sugar and salt to the nuts and mix well to combine.
To assemble and bake the baklava:
- Adjust oven rack to lower-middle position. Preheat oven to 300 degrees F.
- Brush a 12-inch round baking pan with melted butter. Set aside.
- Carefully unfold the phyllo onto a large cutting board. Gently smooth out the phyllo with your hands to flatten. Place the baking pan on top of the phyllo stack. Using the pan as a guide, cut the stack of phyllo to fit the pan. You will need about 30 round sheets of phyllo for this recipe. Cover the phyllo with plastic wrap, then a damp kitchen towel to prevent drying. Set aside.
The breakdown of the layers:
- 8 sheets phyllo⅓ of the nut mixture (about 1 ⅔ cup)6 sheets phyllo½ of the remaining nut mixture (about 1 ½ cups)6 sheets phylloAll the remaining nut mixture (about 1 ½ cups)8 - 10 sheets phylloI recommend keeping a pencil close by to keep track of the phyllo. If you get interrupted, the phone rings or the dogs need out, it’s easy to lose track of how many layers you have already buttered and put in place.
Assembling the baklava:
- Place one phyllo sheet in the bottom of the baking pan and brush with butter until completely covered. Repeat with 7 more phyllo sheets brushing each with butter. Make sure there are no large bubbles of air trapped under the phyllo. The air bubbles can be smoothed out with the pastry brush easily.
- Distribute ⅓ of the nut mixture over the phyllo. Cover the nuts with another sheet of phyllo. Drizzle with butter instead of brushing as the phyllo will slip and move if you use pressure. Dab the butter around to cover the first sheet. Repeat with 5 more phyllo sheets, brushing each with butter before adding the next.
- Layer ½ of the remaining nut mixture over the phyllo, then repeat with 6 sheets of phyllo and butter, and then the last of the nuts. Finish the stack with 8 or 10 sheets of the phyllo, brushing all but the final sheet with butter.
- Using the palms of your hands, gently compress the layers, starting in the center and working outward to remove any air pockets. Spoon about 4 tablespoons butter on the top layer and brush to cover the entire surface.
- Using a sharp chef’s knife with a pointed tip, cut the baklava into 4 equal wedges, then each wedge in half to form a total of 8 wedges. Working within one wedge at a time, make two straight cuts, 1 inch apart, parallel to one side of wedge. Make two more cuts, parallel to opposite side of same wedge, creating a diamond pattern. Repeat process in remaining 7 wedges. See photos for help - it’s a visual thing.
- Bake until golden and crisp, about 1 ½ hours, rotating the pan halfway through baking. Immediately after removing the baklava from the oven, slowly pour the cooled honey syrup over the cut lines until about ½ cup remains. Drizzle remaining syrup over the surface. Sprinkle each piece with a pinch of ground pistachios or walnuts. Cool to room temperature on a wire rack, about 4 hours. Cover with foil and let stand at room temperature for 8 hours or overnight before serving. The flavor improves after resting overnight but is ready to serve once cooled.
- Baklava can be wrapped tightly in foil and kept at room temperature up to 10 days.
Recipe Notes
- TIPS: For this recipe I used a 12-inch round cake pan. Cutting the phyllo into round sheets causes more waste of phyllo than using a rectangular pan. If you prefer, use a traditional straight-sided metal 13 by 9-inch baking pan. If you use the 13 by 9-inch pan, reduce the pistachios to 8 ounces, the walnuts to 8 ounces and the phyllo to 1 pound. DO NOT use a non-stick baking pan as it will be marred when the baklava is cut. A glass pan will work fine if you don’t have a metal pan. Also if making the smaller pan of baklava, reduce the honey syrup to: 3/4 cup sugar, 3/4 cup of water, 1 cup honey 1 1/2 tablespoons fresh lemon juice and 1/8 teaspoon salt.
- Inspired by several recipes with the basic instructions adapted from Cook’s Illustrated.
Nutrition
Delicious Honey infused Baklava recipe with Walnuts and Pistachios
Baklava is an incredibly delicious pastry made with sheets of phyllo dough saturated in butter, nuts and honey with a bit of lemon. It keeps well at room temperature for 10 days and is easily made ahead for events.
We use cinnamon in our recipe but feel free to add a bit of cardamom too. This lovely ancient dessert is worth the effort. It’s not hard to make but does require a little time in the kitchen. Enjoy and be sure to share!
Maybe we’ll try making homemade Turkish Delight next. If you also love honey flavored desserts, don’t miss our Honeycomb Candy recipe. It’s super easy to make and so good, too.
Finally, what’s your favorite Middle Eastern dessert?
Angie
This is an amazing recipe. I have made it twice and people keep asking for it!
Tricia Buice
Thank you Angie. It’s such a treat! I’m glad you all enjoyed it.
Clydell Willis
Can I add more syrup if my baklava is dry
Tricia Buice
Absolutely Clydell. More syrup won’t hurt. Enjoy!
MS100
I’m so stoked. Was looking for a baklava recipe that used honey and yours looks so fabulous. My husband has a very nice 12″ cake pan that he has never used since he baked a friend’s wedding cake over 30 years ago! I’d say that serendipity is happening.
Tricia Buice
It’s a sign! Enjoy 🙂
Kim P.
First time making baklava so I followed your recipe to the T and it turned out just as beautiful as your photo. Although I was good with just using a 1 lb box of philo and even though I measured, I had a lot of left over nuts and butter. I’d say 2 sticks of butter and maybe 10 oz of each nut would be perfect. Can’t wait to service it to my family for Christmas dinner dessert. I’m sure its going to be delicious! Thank you for the idea and sharing your passion! Happy holidays!
Tricia Buice
Thank you Kim! I’m thrilled it turned out as expected. Have a wonderful holiday and enjoy 🙂
Liz
I don’t see any measurements for ingredients?! 👎🏻
Tricia Buice
Hi Liz. The measurements are on the printable recipe card at the bottom of the post. You can use the JUMP TO RECIPE button at the top of the post or scroll down until you find it. Enjoy!
Nancy
Your instructions and tips were perfect. I just made this and it looks exactly like yours!
Tricia Buice
Thank you Nancy! I’m so thrilled you’re happy with the recipe. Bravo!!
Anisha
If I want to make this in a 10 inch round pan, how long should I bake for? I will probably cut down on the filling a bit too.
Tricia Buice
Hi Anisha. I have not tested this recipe in a smaller pan but feel sure it will work. I would start with 90 minutes and go from there. If it starts to brown too much on the top, tent lightly with foil. As for cutting down on the filling, I don’t know how this will affect the finished product. It may not hold together well without enough sticky filling. Good luck and let us know how it turns out for you.
Pat Kenderdine
Thank you for these wonderful recipes. What I really appreciate are the notes, hints, tips and detailed instructions. Keep up the good work!
Tricia Buice
Thank you Pat!
Laurie
Getting ready to make my baklava. Took out my sheets of Filo dough to defrost and Realized that my pillow though is only 10 1/2 inch wide. I bought the 12 inch pan and now I’m afraid that the Filo sheets are too small. What should I do
Tricia Buice
Hi Laurie – Hope it’s not too late to answer your question. You can piece it together but you made need more than the one package. Sorry!
Jenna
Hello, if we use a 13 by 9 inch pan, how much butter should we use? Thanks!
Tricia Buice
Hi Jenna – I didn’t list the amount of butter you will need for a 13×9-inch pan because you will still need about 1 1/2 cups. Maybe start with 1 1/4 and see how that goes. Lots of butter in this delicious dessert! Enjoy 🙂
Susan
I haven’t tasted Baklava in years but I remember how delicious it was when I did! This is so beautiful and Middle Eastern bakery worthy, Tricia.
Tricia Buice
Thanks Susan – it’s such a special treat!
Julie G
I love, and have always wanted to make, Baklava! Seeing the beautiful pictures of the recipe you made gives me confidence to try it. While it appears complex, the steps you list seem like it’s something I could tackle. My coworkers, along with my husbands coworkers, and family are our taste testers and I know they would love this one. Galaktoboureko is another favorite and I’d like to give it a try also.
Tricia Buice
Thanks Julie! I hope you will try. It’s so much easier than you’d think. Bet your taste testers love it too 🙂 I’ll have to look into the Galaktoboureko. Thanks again!
Teresa
I’m not a fan of walnuts and pistachios, can pecans be substituted?
Tricia Buice
Hi Teresa – you can use any kind of nut you want. Pecans would be great! Enjoy
angiesrecipes
wow Tricia, this one looks phenomenal! Wish I could have a slice with my tea now…the layers of goodness are totally irresistible.
Tricia Buice
Thanks Angie – I was very glad to get this out of the house or else I would enjoy it a little too much!
sue | the view from great island
Um…..wow. That’s all I can say, it’s just spectacular! I have always loved this dessert but never dared to attempt it, but I think you’ve inspired me!!
Tricia Buice
I was shocked at how simple it was to make. It just take some time to assemble but is very basic. Hope you get the chance to make it! Thank you 🙂
Monique
Mine have never been this gorgeous.Never.Beautiful Tricia.
Tricia Buice
Oh I bet it has Monique – thank you so much 🙂
Larry
That looks fabulous Tricia and my wife and daughter would love it. Such a creative way to cut it.
Tricia Buice
Thanks Larry!
Jennifer @ Seasons and Suppers
Stunning! Baklava has been on my baking bucket list, too, so I’m making this one asap 🙂
Tricia Buice
You are going to love making it Jennifer – such a fun project.
Chris Scheuer
Those lucky taste-testers! Bravo to you Tricia, this looks as good as any baklava I’ve ever had! And that fancy cutting is absolutely gorgeous!
Tricia Buice
Thanks Chris – it was a fun project and I would make it again in a heartbeat.