
This post may contain affiliate links. Please read my disclosure policy.
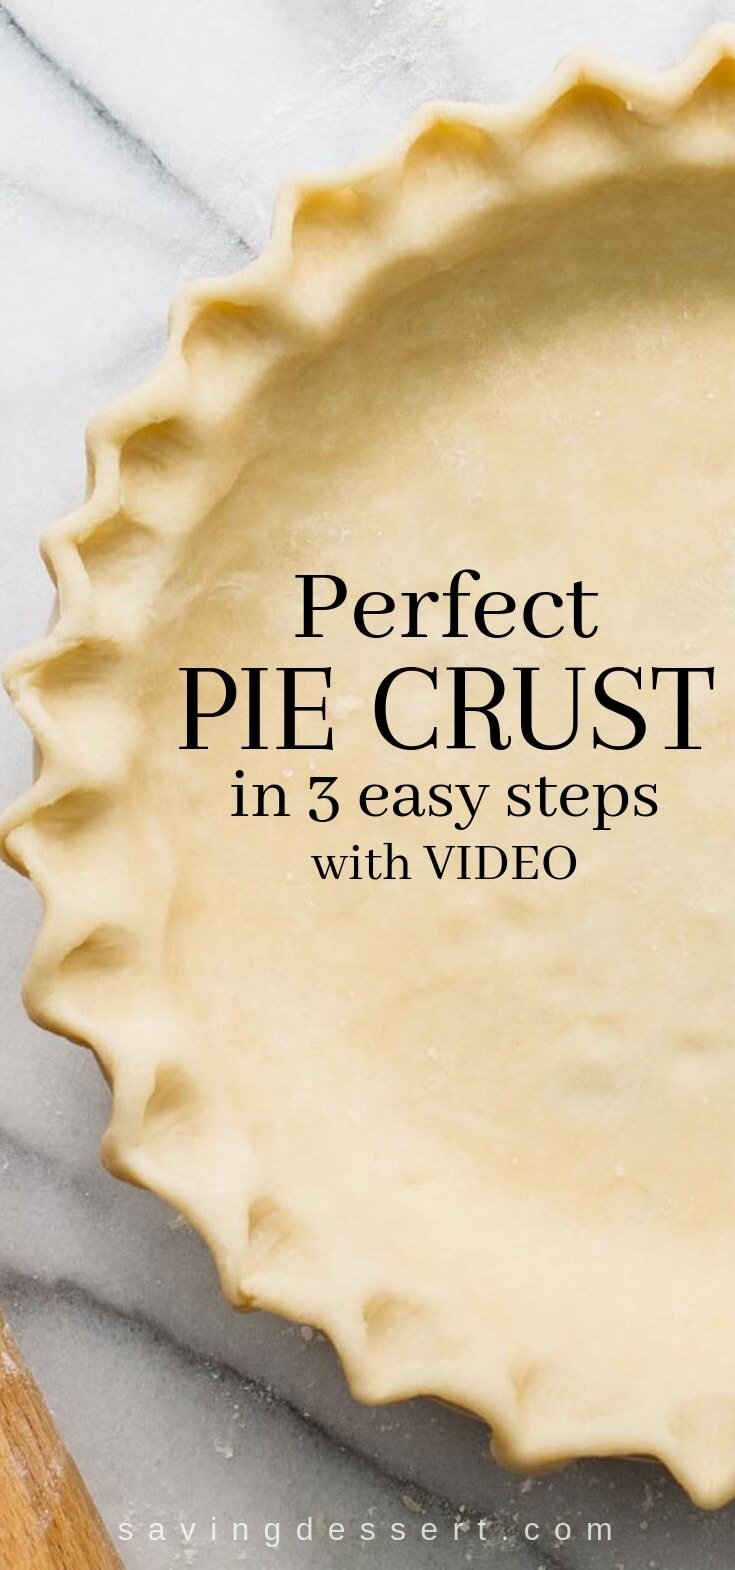
Perfect Pie Crust in 3 Easy Steps

With just a little patience and practice, you can make flaky pie crust for all your favorite recipes.
Thrill your pie loving friends and family and let this be the year you make homemade, completely from scratch, pie crust! But before we get ahead of ourselves let’s start by saying I’m not a pastry chef, nor do I claim to have the only pie crust recipe in the world that works.
However, I’ve been making pies since I was 10 years old (a long time ago), and I once won a blue ribbon at a county fair for my apple pie. Not the same as a being a star on a cooking show, I know, but I’ve done the homework. Pies have always been the most requested desserts I make.
There are almost 100 pie recipes posted on the blog so I think it’s safe to say, I have some pie street-cred!
I’ve also provided some tips and a trick or two to help prevent soggy bottomed pie crusts. Read on!
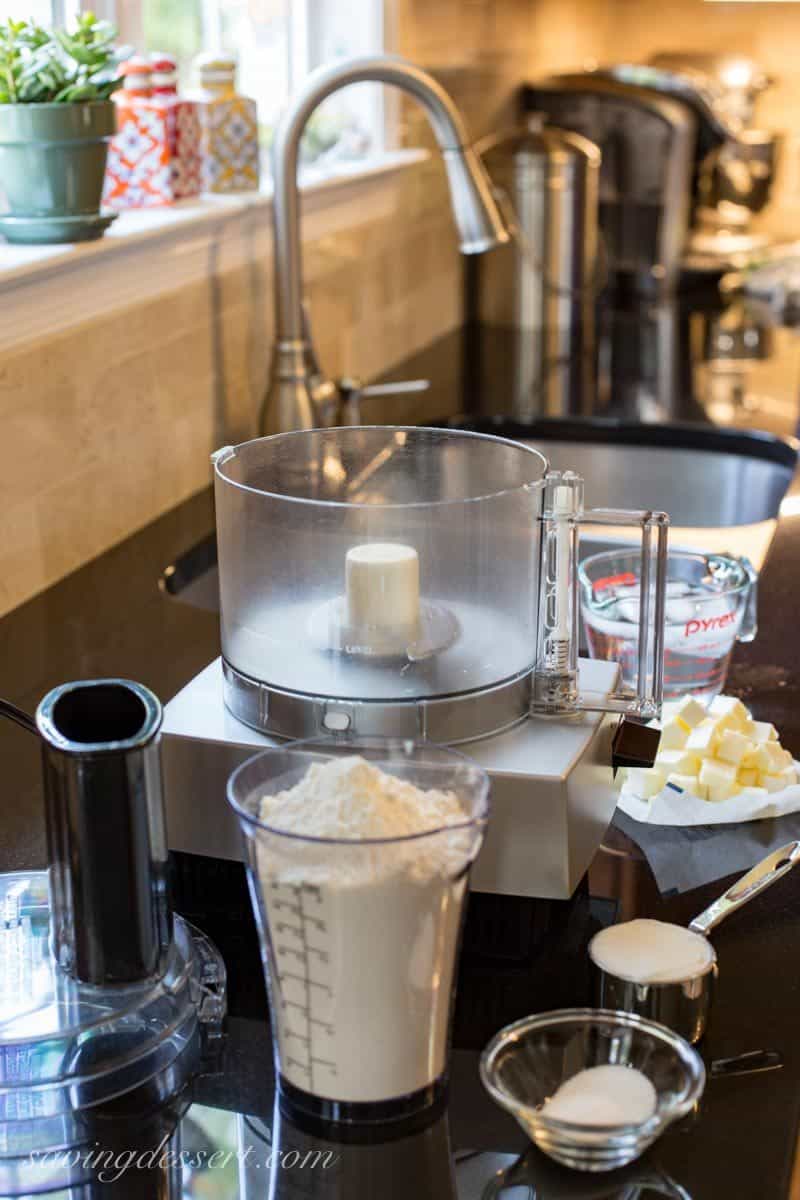
Our easy recipe is made right in a food processor
You don’t have to use a food processor to make perfect homemade pie crust recipe, but it sure makes it easy!
I’ve shared a link for an inexpensive pastry cutter at the end of this post. It’s a great tool for making our Perfect Pie Crust Recipe without a food processor.
This recipe makes enough for two pie crusts. I recommend making the recipe as is and freezing the second disk of dough if not needed immediately.
Frozen pie pastry will keep for 3 months if sealed in plastic wrap and stored properly in a freezer bag. Thaw the dough overnight in the refrigerator before rolling out, filling and baking.
STEP 1: MAKE THE DOUGH
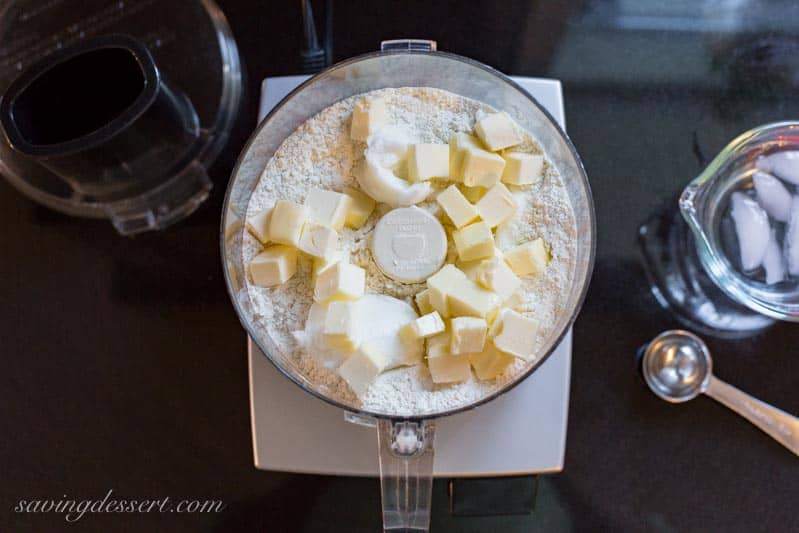
Combine the flour, granulated sugar, salt, cold cubed butter, and Crisco shortening in the bowl of your food processor.
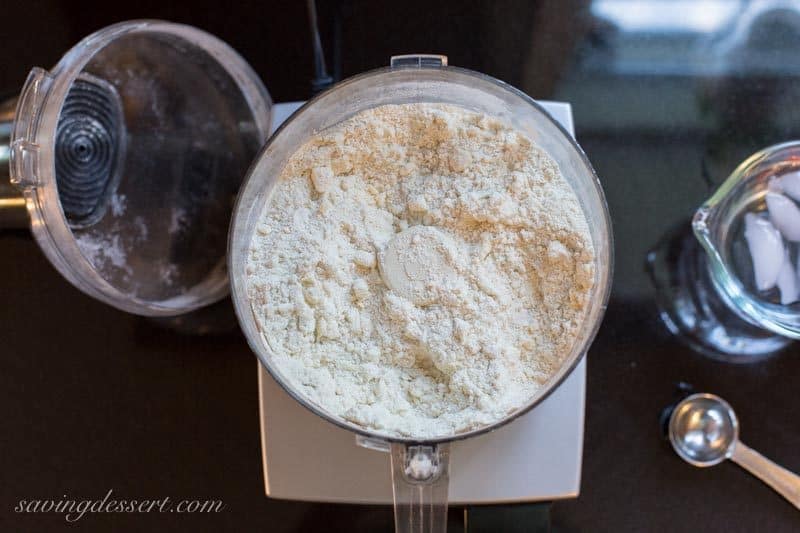
Process (using short bursts/pulses) until the mixture resembles a coarse meal. There should be some small pea sized pieces of butter visible. For a tender crust do not over process.
Add three tablespoons of ice cold water and pulse a few times to combine. It should start to come together with plenty of dry flour still visible.
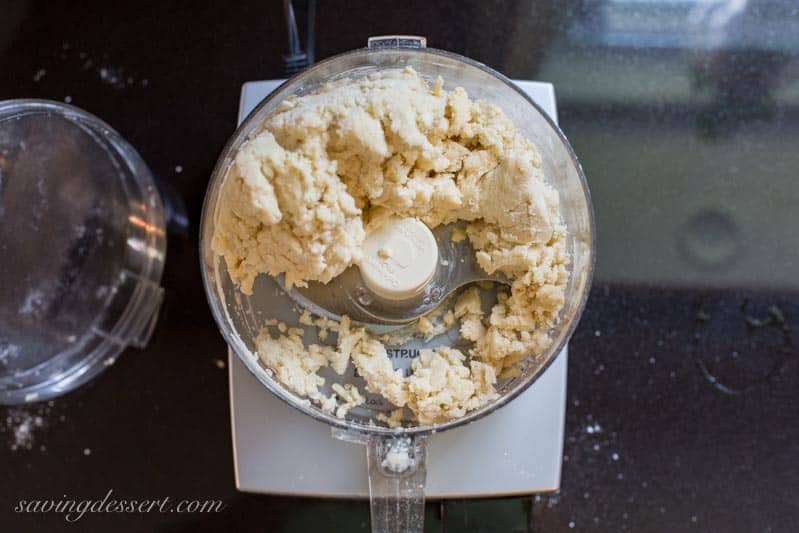
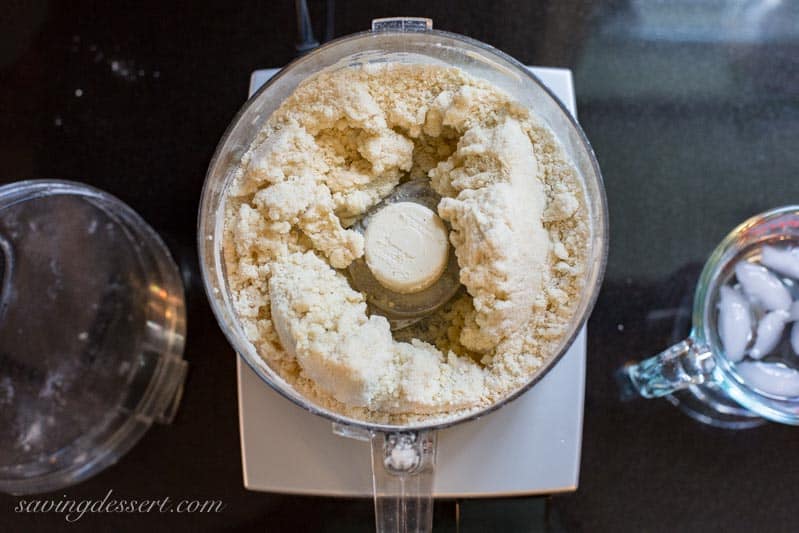
Add the remaining 3 or 4 tablespoons of cold water and process just until it starts to clump together.
STEP 2: FORM THE DOUGH INTO A DISK AND REFRIGERATE
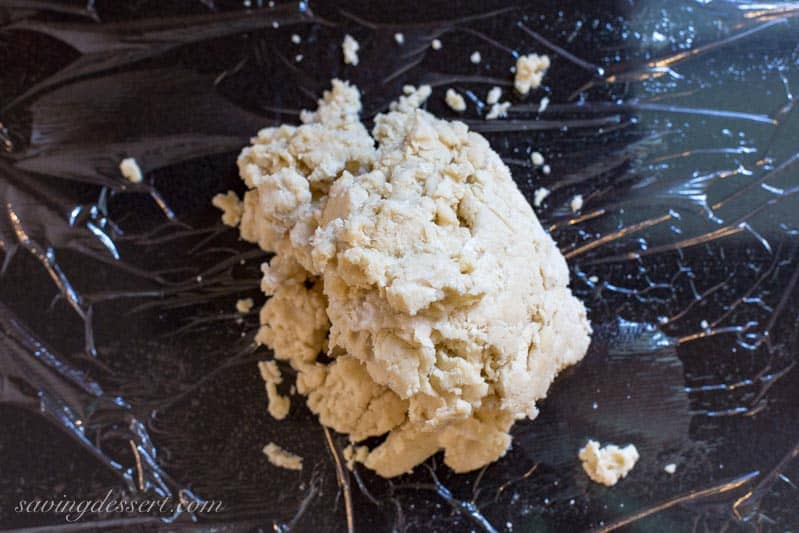
Dump the crumbly dough out onto a piece of plastic wrap. Gather the dough together, form into two disks then wrap each one individually. Refrigerate the dough for at least an hour, or up to three days. Overnight works best!
STEP 3: ROLL, TRIM & CRIMP
Place the dough on a lightly floured work surface. Start rolling the dough from the center and push it out rotating the dough as you go. I’m a visual learner and if you are too, check out our how-to video for a look at the entire process! Also, check the tips at the bottom for lots of great information about making Perfect Pie Crust.
Ease the dough into your pie dish taking care not to pull or tear the dough.
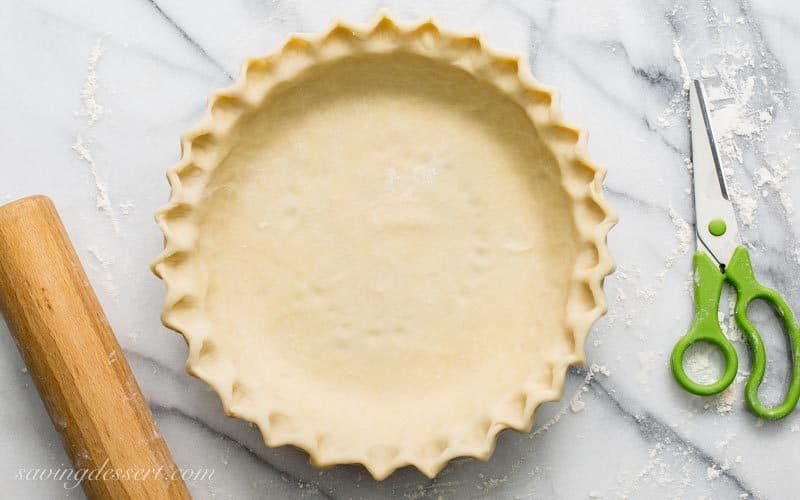
Pinch the edges of the dough together with your thumb and forefinger. Once the crust is rolled out, trimmed and crimped, you can load it up with your favorite fillings and bake.
How to make a crust for no-bake pie fillings
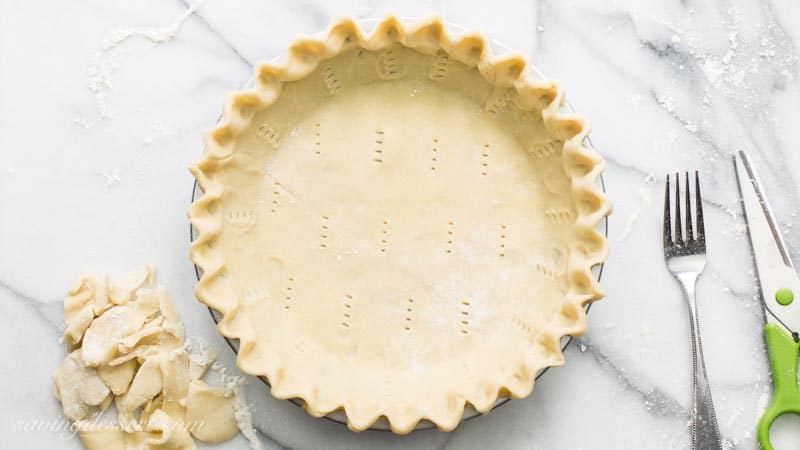
Or if you’re making a no-bake pie filling (like our Icebox Strawberry Pie) you can pre-bake or blind bake the crust. Prick the entire pastry with a fork, line it with a piece of parchment paper, fill it with pie weights (see link below), or dried beans and bake until set.
Remove the beans and parchment paper and set aside. Brush the partially baked crust with a beaten egg white and return to the oven. Bake for a few more minutes or until browned. Cool and fill as needed.

Why do you add beans or pie weights when baking an unfilled pie?
Pricking the bottom and sides of the pastry helps prevent large bubbles from forming. Adding the pie weights or beans prevents the dough from sliding down the sides of the pan and keeps it where it needs to be. Fill as desired.
Our Perfect Pie Crust recipe makes enough dough for two single crusts or one double crust pie.
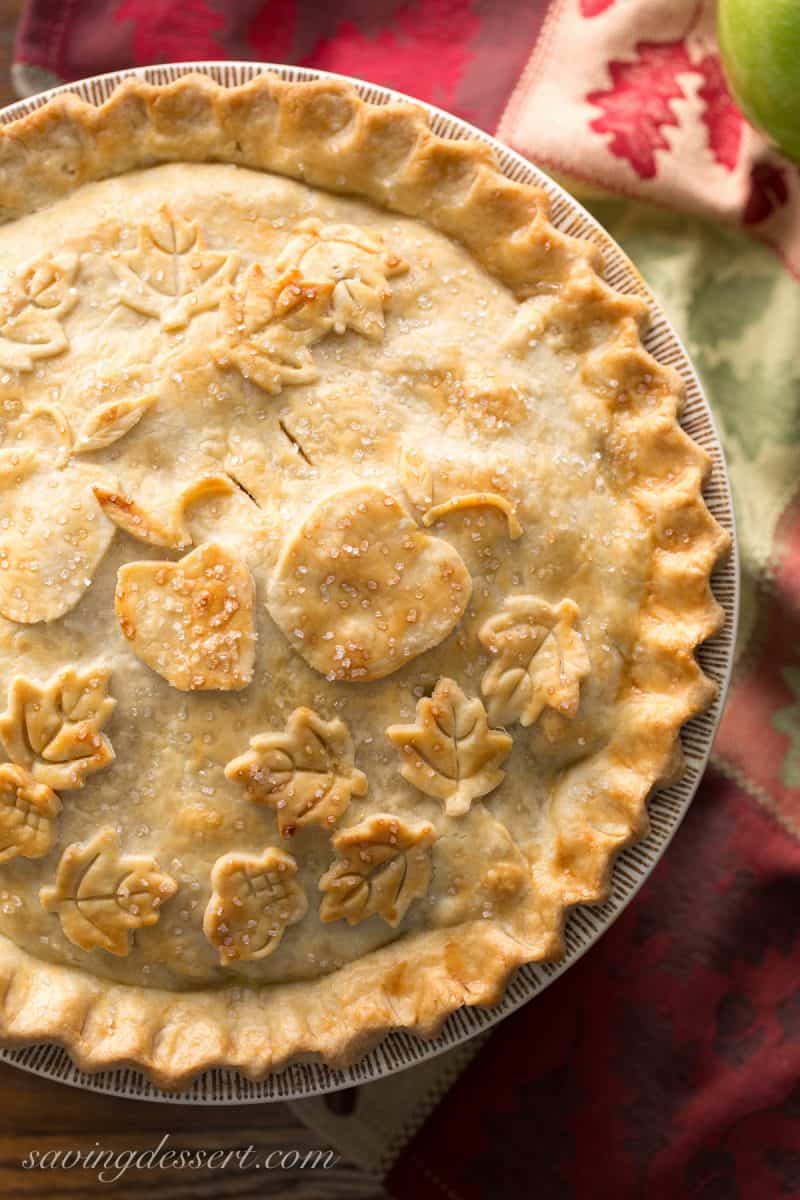
This recipe makes enough dough for our Classic Double Crust Apple Pie made in a 9-inch pie plate. You should have enough scraps leftover to cut out decorative dough cookies to decorate your pie. When making a double crust, be sure to brush the entire top of the pie with an egg wash. I also like to sprinkle the unbaked pie with a little coarse sugar.
The egg wash helps the pie turn a beautiful golden brown and gives it a shiny finish when baked.
How to prevent a soggy bottom pie
Soggy bottoms can be troublesome in double, and unbaked single crust pies. However, I’ve picked up a few tricks over the years and found a fool-proof way to ensure the bottom crust browns and holds up well, even under all that creamy filling.
- When you’re ready to bake, place an aluminum foil lined, rimmed baking sheet or baking stone in the oven while it preheats.
- Make and assemble your pie in a heavy metal or aluminum pie plate.
- Place the pie pan on the preheated stone or pan and bake!
- Direct contact with the hot metal of the pan helps to brown and crisp the bottom crust under all the filling.
This really works so if you’re concerned or worried about soggy bottoms, try using an aluminum pan on a hot baking stone or cookie sheet. This really works!
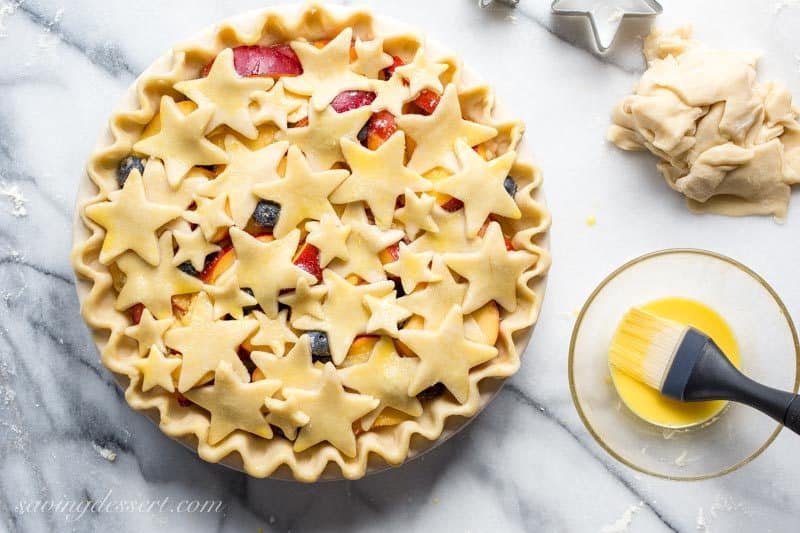
Cookie cutters or pie crust punches are an easy way to decorate pies.
Another easy method for decorating pies is to use cookie cutters to create a themed design. Stars are great for patriotic holidays, leaves and pumpkin cut outs for fall, and snowflakes for winter.
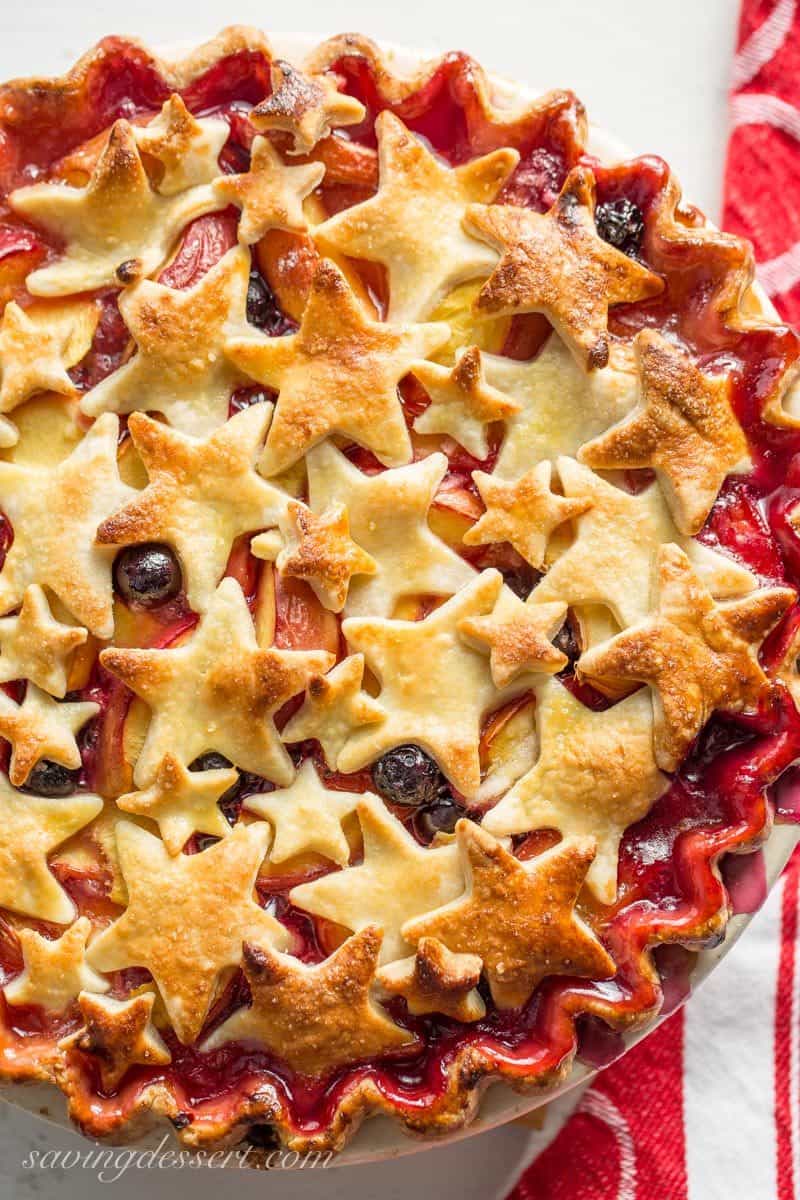
I especially love the cookie cutter method when decorating fruit pies.
The juices bubble up in between the cutouts adding color and appeal. Check out this easy recipe for Nectarine Blueberry Pie complete with a how-to video.
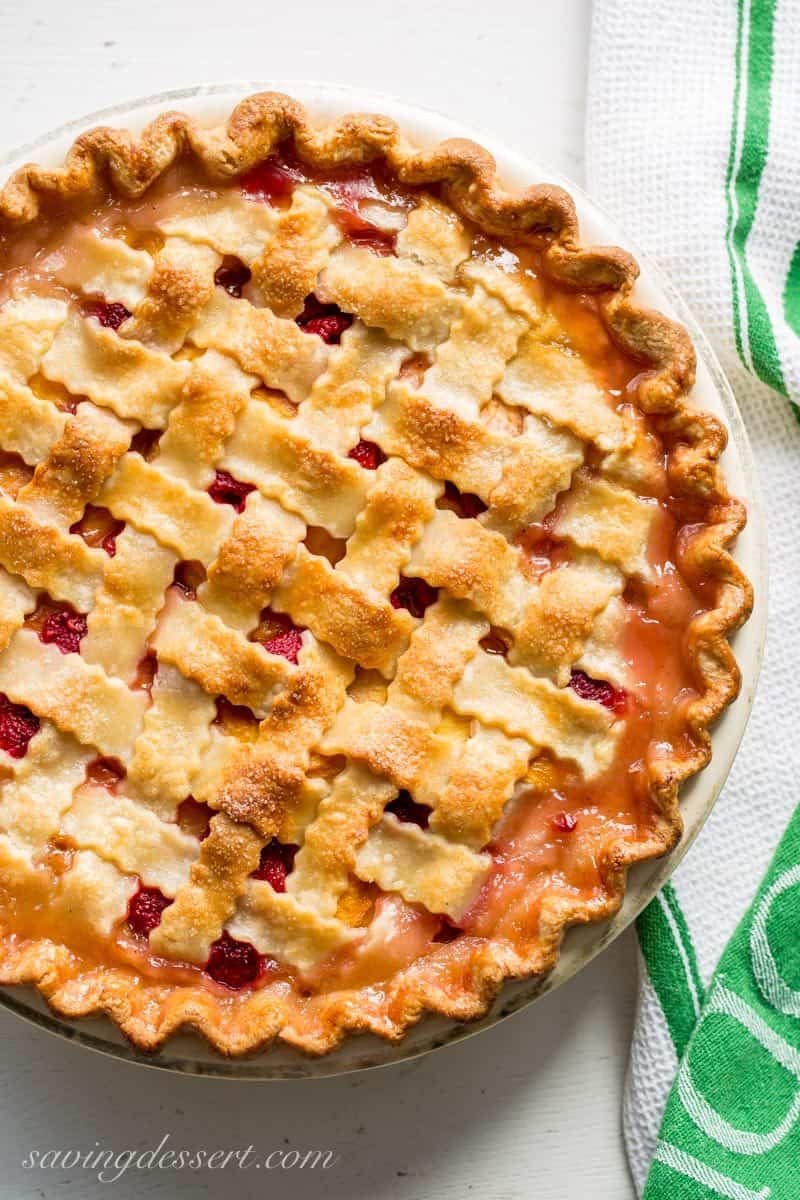
Our Peach Raspberry Pie features a beautiful lattice crust. We shared a how-to video to see how easy it is to weave the design.
Make the strips of dough as thick or thin as you want for the desired appearance. Pies don’t have to be perfect to turn out great. Each one is unique and different but always delicious!
Tips for Making Perfect Pie Crust
- When measuring the flour, spoon it gently into a measuring cup and level off the top using the back of a table knife. If you scoop out the flour using the measuring cup, it will be packed and you’ll end up with too much flour, making the dough crumbly.
- If you have a kitchen scale, I recommend using the measurements noted in grams and ounces.
About the ingredients:
- It’s important that your butter is very cold and cut into cubes. If the butter is not cold, the dough will stick to your work surface. Cut your butter into 1/2-inch pieces and refrigerate until needed.
- I’ve found, through lots of trial and error, that a pastry crust made using half butter and half solid shortening performs the best. The crust will turn a beautiful golden brown but not be greasy like many all-butter crusts can be. I don’t refrigerate my Crisco shortening but it wouldn’t hurt if you want to try.
- I always use good quality unsalted butter. European style butters are usually the best. I’ve ruined more than one crust using generic or grocery store brands of butter that may be greasier or have more moisture than good quality butters. I also prefer to add my own salt instead of buying salted butter. Personally, I can tell a difference in the flavor.
- Use ice cold water. Fill a measuring cup with ice, then cold water. Set aside until needed.
The how-to’s for perfect crusts:
- Do not over process the dough if using a food processor. There should be small chunks or pea sized pieces of butter visible. The chunks of butter melt when baked creating the flaky layers we all love in a good crust.
- If too much water is added to the dough, it will become tough and no longer flaky. I like to add the least about of water needed to form the dough. I start by adding 6 tablespoons, then add the 7th if needed. Humidity can also affect the dough so use less to start and add more if needed. The dough should never be pasty or wet.
- Refrigerate the dough at least an hour, but preferably overnight, before rolling it out.
- Generously flour your work surface before rolling out the dough.
- Use a good wooden rolling pin, and never wash it with soap. Clean with hot water and dry before storing.
- It’s nearly impossible to roll out dough on a hot counter top. Marble surfaces are popular for rolling dough because they are cool. You don’t need marble but make sure the surface is cool and the room temperature is not too warm.
Rolling out the dough:
- If the dough has been refrigerated for more than a few hours, you may need to let it rest for 10-15 minutes before it’s soft enough to roll out.
- Roll the dough into a large circle, turning the disc as needed and adding flour to the work surface as needed. Next, roll the dough out from the center toward the edges and work all the way around in a clockwise pattern until large enough to fit inside the pie plate with at least 1-inch of dough hanging over the side. (See video)
- Run your hand over the dough as you roll it out to check for thick or thin spots. The dough should have an even thickness all the way around.
- Never stretch or pull the dough. Ease it into the pie plate and scoot it around if needed to fit properly. Stretching the dough could cause thin spots that will not cook evenly and may leak filling into the pie plate.
- If you have leftover scraps of dough, roll them out again and cut into various shapes using cookie cutters. Brush the “dough cookies” with an egg wash and sprinkle with cinnamon and sugar. Bake for 10-15 minutes until browned. Crust cookies are great as decorations on cream pies, or served as cookies. Waste not – want not!
- If using dried beans as pie weights, you can cool them down after baking the crust, then store in a container until you make another pie!
Thanks for PINNING!
Perfect Pie Crust Recipe
Ingredients
- 2 ½ cups all-purpose flour (320g)
- 1 teaspoon granulated sugar
- 1 teaspoon salt
- 8 tablespoons cold unsalted butter cut into 1/2-inch pieces (4-ounces or 113g)
- ⅓ cup solid shortening (63g) like Crisco
- 6-7 tablespoons ice water
- 1 large egg whisked with 1 tablespoon water (for egg wash)
- 1 tablespoon coarse sugar for topping if desired on double crust pie
Instructions
- Combine the flour, sugar and salt in the bowl of a food processor. Pulse to combine. Add the butter and shortening and process (using short bursts/pulses) until the mixture resembles a coarse meal. There should be some small pea sized pieces of butter visible. Add 3 tablespoons of the cold water and pulse a few times to combine. Add 3 more tablespoons water and process until the dough starts to hold together. Don't over process. Add one more tablespoon of water, if needed, for a total of 7 at the most.
- Gather the dough together and divide in half. Form each half into a flat disk about 6 inches round. Wrap each disk in plastic wrap and refrigerate at least 1 hour or up to 3 days. You may need to let it come to room temperature for 15 minutes for easier rolling if it's too cold.
- Place a disc of dough on a well floured, clean work surface. Using a rolling pin, start in the middle of dough and push outward with even pressure. Start again in the middle and press outward but move around like you're hitting all the numbers on the face of a clock. Start at 12 o'clock, move to 2 o'clock, etc. until the dough is in a circle large enough to allow for a 1-inch overhang. Trim excess dough with kitchen shears.
For a double crust pastry pie
- Fill and top with the remaining pastry in your favorite design, i.e. lattice, cut-outs, solid top, etc. Brush the top crust with an egg wash made by beating one large egg with 1 tablespoon of water. Brush over the crust and sprinkle with sugar before baking.
- To help prevent a soggy bottom crust, place a baking sheet or baking stone in the oven while preheating. Use an aluminum pie plate to make the pie. Place the filled pie directly on the hot pan or baking stone. Contact with hot metal will help the bottom crust cook quickly before it has a chance to get soggy. It will also brown nicely.
For a Pre-Baked Single Crust
- Pierce the sides and bottom of the pastry with a fork. Refrigerate the crust for 30 minutes. While the pastry is chilling, preheat the oven to 375°F. Remove the pie crust from the refrigerator and place on a baking sheet. Carefully line the pastry with parchment paper, then fill with pie weights or dried beans. Bake the crust for 20 minutes.
- Remove the parchment paper and pie weights or beans and set aside. Brush the inside of the pie crust with a beaten egg white. Return the crust to the oven and bake another 10 minutes or until it starts to brown lightly. Remove from the oven and set aside to cool while preparing the filling.
Recipe Notes
- If only using 1/2 the recipe, wrap the extra pie dough in plastic wrap and seal in a freezer bag. Frozen dough will keep for up to three months. Thaw overnight in the refrigerator.
- If the dough splits while rolling out, it needs to soften. Allow it to rest at room temperature another 5 minutes, then try again.
- Substitute 1 teaspoon to 1 tablespoon of vodka for equal parts water
Nutrition
What’s your favorite pie?
Our family loves different kinds of pies at different times of the year.
Blueberry Crumble Pie is a favorite anytime, and our rich Chocolate Pecan Pie is the family choice at the holidays.
Food and Wine has a lovely post listing the Top 10 All-Time Favorite Pies. I think I want to make them all!

Bea
The perfect pie crust recipe indeed..I never use a food processor because it cuts the butter to small & I’m a firm believer in touch. When you use your finger tips then YOU control the outcome. It’s truly flaky & layered almost like looking at puff pastry layers!
Tricia Buice
Thanks for the feedback Bea. I’m so glad you like it!
AltChickinDallas20
I am so frustrated! I am attempting to make a pie crust with your instructions/directions for the third time and I cannot get the hang of it. You mention a “video” literally 4 times on this page – I know because I have wasted so much of my time looking for it. My SO wanted a raspberry pie for his birthday tomorrow and I’m trying so hard to deliver but I’m giving up on you and your pies. I’m so disappointed in you and your half-ass promise of a How-To Pie Crust with No Video.
Tricia Buice
I’m sorry you had so much trouble Julie. At the top of the post there is a button titled JUMP to RECIPE. If you click that you can skip the entire post and get just the printable recipe card. From there, you scroll up just a bit and find the video is directly above that card. I’ve always said that if you’re making a new recipe for the first time, never wait to try it on a holiday or special occasion. If you needed it for a special birthday, I think you should have tried the recipe before the big day. There are no un-delivered promises on this post. Perhaps this just wasn’t your day to bake.
AJ
I’m going to make apple pie in a cake pan like my Mom always did for Holiday meals. Would I double your recipe to have enough dough for a cake pan?
Tricia Buice
Hi AJ. One recipe for my pie crust will make enough for a double crust pie. It’s a generous amount and hopefully you’ll have enough left over to cut out some decorations. Don’t roll it out too thick and you should be fine with one recipe. Enjoy!
Karla
I’m curious about the option to substitute vodka for some of the water. What does the alcohol do differently for the pastry than the water? Thanks!
Tricia Buice
Hi Karla. Vodka adds liquid without causing gluten to form which can make pie crusts tough. Hope you’ll try it sometime.
Lorrie Jo
I just put this together (to put in the fridge for a quiche tomorrow) and followed the directions to the t. Crumbly. 🙁 I used a scale for perfect measurement. I live in CO. Could it be too dry here? I’m so disappointed
Tricia Buice
Hi Lorrie. It must be the altitude. Please add a few more drops of water and see if that helps.
Ali
Hi Tricia—could you tell me how to adjust your recipe for one Deep Dish pie crust? Since the recipe will make 2 crusts, would 1-1/2 amount of the dough, instead of the full 2 crusts, work? Thanks for your help.
Tricia Buice
Hi Ali. Great question. The recipe makes enough for two deep dish pie crusts so no need to adjust. However, if you’re not using a standard deep dish pie plate you may want to add 1/2 a recipe more. Hope that makes sense! Enjoy!
Lisa
Can you use lard instead of Crisco?
Tricia Buice
Hi Lisa. Yes lard will be fine. Enjoy!
Susan
Hi any suggestions for a vegan friendly pastry?
Tricia Buice
Hi Susan. I would replace the unsalted butter with vegan butter. The vegetable shortening should be fine. Good luck! Let us know how this turns out for you.
Monica
Can I use coconut oil as a substitute for shortening?
Tricia Buice
Hi Monica. I haven’t tried using coconut oil so I’m not sure. I’d be very interested to know if you do and how it turns out. Thanks!
Tricia Buice
Hi Alison. I agree with your statement. One cup of flour on my chart is 126 grams. I’ve been making this crust with the measurements listed and it works perfectly. Thanks for checking!
Mrs. Diane Tharachai
Very hard to work with this dough. Falls apart to much.
Tricia Buice
Hi Diane. Sorry you had trouble with the dough. Sounds like you added too much flour or not enough water. Humidity can also play a roll when making pastry. If your house is very warm and dry, that can affect the dough. Be sure you let the pastry soften for a few minutes before rolling out. If it’s too cold it will split.
Terry
Exactly. Can’t roll it as big as specified because it falls apart.
Tricia Buice
Sorry you had trouble Terry. Not sure where you went wrong but I am positive it’s not this recipe. I’ve made it hundreds of times and never had trouble with it falling apart. Make sure you are measuring your flour properly. For tips on how to measure flour check out our post with Top 9 Baking Tips and Tricks
Judith Spada
I followed the recipe exactly and it is very dry and cracking. Fell apart when I tried to make a disk. I used 6 Tbs of ice water and it said I could add 1 more for a total of 7 Tbs. and no more! I put it in plastic wrap and in fridge at night and I will roll it out in the morning. What can I do if it falls apart while rolling it out tomorrow?
Tricia Buice
Hi Judith. Humidity levels can vary during the year affecting the amount of water you need, and the pastry. It sounds like you should have added the last tablespoon of water. Also, sometimes flour is easy to over-measure which can also make the crust dry. If you have trouble rolling it out, sprinkle the dough with a little cold water and fold together a few times. Don’t use too much flour when rolling out as it might make the pastry more dry. Good luck and happy baking!
GrammiePie Lois
Soggy bottom crust is my worst problem…how do I prevent that ? blind baked but the rhubarb pie was still soggy.
Tricia Buice
Hi Lois. The only thing that has worked for me is to preheat the oven with a baking stone or heavy baking pan inside. Place the pie directly on the hot pan and bake as directed. This helps crisp up the bottom quickly so it doesn’t have time to get soggy. Hope this helps!
Pamela
Seriously!!!! The perfect pie crust recipe. I’ve never been good at pie crust, until now. This recipe with all the great tips, comes together beautifully and rolls out easily. I used it for your quiche Lorraine and it was absolutely gorgeous. I’m actually looking forward to making all the pies this Thanksgiving and making the crust from scratch. Thank you!!!!
Tricia Buice
So happy this worked for you Pamela. Thank you so much!
Dawn Haley
Beaten egg white brushed on crust will prevent soggy bottom crust
Tricia Buice
Yup! That works too 🙂 Thanks Dawn
Pamela
I’ve never been great with pie crust….until now. Your recipe, and tips enabled me to make a gorgeous and delicious quiche lorraine (also your recipe ❤️). This pie crust came together and rolled out perfectly. Thank you for such a great recipe and tutorial.
Tricia Buice
Your comment made my day Pamela! Thank you so much for trying our recipe and for the feedback. Good for you! 🙂
Sanam
Followed this recipe for the crust which is now in the fridge. I plan to make the Maple Walnut Pie from your recipes using this crust. Just a little confused, if I shall bake the crust before pouring in the walnuts and syrup (if so, for how long) or just pour the mixture and bake it all at once. Thanks.
Tricia Buice
Hi Sanam. No need to bake the crust first. Pour the walnuts then syrup into the unbaked pie crust. Place the unbaked pie on a preheated baking stone or baking pan in the oven to help crisp the bottom crust. Enjoy! Thanks for trying our recipes 😉
Sanam
Followed your recipe for both, pie crust and Walnut maple pie and it turned out SO GOOD. Made it for Mother’s day and everyone loved it. This will now be my go-to recipe for crust and pie. Thank you!!
Tricia Buice
Thank you Sanam! So glad you all enjoyed it. Love those toasty walnuts 😉
Gigi
Great job!
Tricia Buice
Thanks Gigi!
Karen
This recipe was so easy and turned out perfectly. Am convinced that measuring the flour in the way described and using ice cubes in the water (though I also use water that I keep in the fridge), is the key to perfection. And only needed to use six tablespoons. I use my stand mixer, so very quick as well. I do tarts and this was so nice to work with, baking to a golden flaky, tasty perfection. And tarts were so easy to remove from the pan – no more greasy or crumbly mess! I can’t wait to make a pie – something I haven’t done in years!
Tricia Buice
Thanks for the feedback Karen! I’m so excited you enjoyed this recipe. Bravo!!!
Jennie
I am making two of your pies for Thanksgiving and want to try your pie crusts. I have never been completely pleased with my attempts at making pie crusts. I have never tried one with part butter and part shortening. My question is about which size baking pie dish to use. I have found that my 9” ceramic pie dish doesn’t cook some fillings as well as my Pyrex glass dishes but I can only find 9.5 glass Pyrex dishes and that’s what I have. Will these crusts work in the 9.5 glass dishes or will I have to roll the dough too thin to fit them? I am still searching for the perfect pie dish! Thank you for always assisting me in my hopes of having success in cooking. I browse your site several times a week and it is a phenomenal site to get ideas and to get better at making recipes. Your clear instructions and videos are like attending a cooking class at Sur La Table. Thank you.
Tricia Buice
Hi Jennie. Sorry to be late in responding. We just moved and didn’t have internet until now. This recipe makes enough dough for two pie crusts, but each should have scraps leftover enough to make cut-outs, etc. You don’t have to roll this paper thin to make it large enough for your pan. 9 1/2 inches will most likely be perfect! I have favorite pie pans, too. One of my best pie pans is an aluminum pan from Williams Sonoma. It conducts the heat well leaving the bottom of the crust well browned, especially when placed on a preheated stone or heavy baking sheet. I’m thrilled you’re enjoying the blog. You absolutely made my day with your lovely comments. Thank you for following along and for trying our recipes! I hope you have a wonderful holiday season and don’t hesitate to reach out if I can help in any way. Enjoy!
Solvay
I keep having the problem of my dough splitting when I’m rolling it out. I don’t think it’s a matter of not leaving it to warm up after the fridge, because I’ll leave them out for 20 extra minutes and see no difference. Even when I’m rolling them to put in the fridge overnight, my dough always seems a little crumbly… Am I not adding enough water? I always do the full 7 tbsp and then even add a little more as I’m rolling it usually…. what is the risk of adding too much water?
Tricia Buice
Hi Solvay. First, make sure you are properly measuring your flour. Stir the flour in the bag or container, lightly scoop it into the measuring cup and level off the top with the dull side of a dinner knife. Double check that you are adding enough fat, too. Don’t add more water because too much will make the crust very tough and chewy, not flaky. Try adding 1/2 tablespoon more of shortening or butter and make sure you’re using a good quality butter. Cheap or generic butter may not have the right fat ratio. I’ve been making this crust for more years than I can count and the only time it splits is when it’s still too cold to roll out. I wait a few minutes and it’s fine. Good luck and thanks for trying the recipe!